
It's been a while that Note 3 is out, and I have not exploited even half of it's practical features. One of these that captured my curiosity is its built in IR blaster. The infrared technology has been around since the birth of remote controlled devices live TV's, DVD's and other electrical appliances. And before bluetooth technology became a standard for mobile phone's data exchange, it was already present to some models. The only thing that makes it awkward to use is it needs line of sight to make a connection.
Now the aging technology is making a comeback, not only using the ordinary mobile phone as it's vehicle but the top of the range smartphones, Samsung Note 3 included.
What it does?
Infra Red signals are used to control appliances with built in IR receivers. It could be anything from TV, DVD, Set Top Box, Air Conditioning, toys and many more. The ability for an IR blaster to control something is dependent to the built in application that drives it. In terms of the IR on Note 3, it can control TV's, DVR's or set top box from SKY or other providers, DVD's, Blu-Ray Player, AV Receiver,Streaming Media Player like Apple TV, and even Airconditioning units, with the use of the built in Samsung Apps WatchOn.
How to set it up?
It is easy, no need to download as it is a native apps in Note 3. Just go to the Samsung Apps folder and tap WatchOn. You can put a shortcut at the Home screen by keeping your fingers on it until it can be dragged out from the folder. You need to be connected into the internet whilst setting up.
1. At launch, you will be required to provide your location (1), the TV service provider(2, I am receiving SKY basic with satellite dish), before you can set up your devices(3). Note that the third picture already have the Sky Shows on it.

2. The first device to set up is the TV(4). Make sure it is plugged and in standby mode. The popular brands are in the list (5) but if your TV is not included, you can access the complete selection(6). Then press the power button (7) to send the control code to your TV.

If the code is correct, then the TV will turn on and press the code works(10). You can send the previous code to try again(8). If not carry on with the second code(9) and so on until your TV is turned on.

3. Next is the Set-top Box(11) provided by TV company. There is SKY+ in the selection and I tried this first. The code is not perfect so I researched for the make of my box and I found out that it is Amstrad(12), similar to the picture below.

4. Same steps follow like sending a code (13) and confirming (14). The remote interface(15) is easy to familiarise, at this point you can turn off the set up equipments by the power button(15) which will prompt you a specific equipment to turn off or you can add more devices by swiping upwards with the button at the bottom of the screen(16)

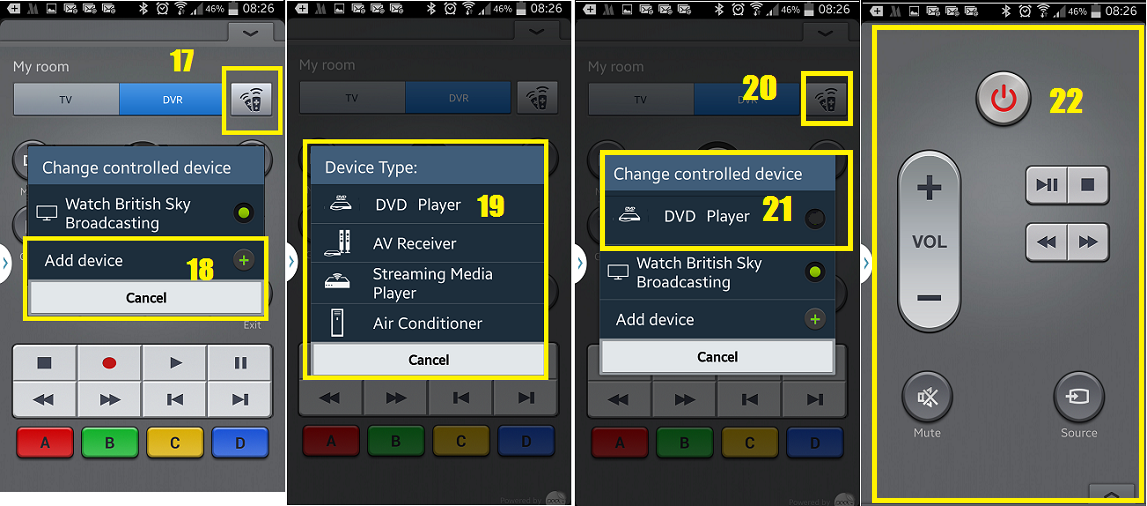
5. Press the remote device(17) and add another device(18). It will again ask you to press a button to turn it on. Be sure the device is on standby. After successful addition, you can change which device to control by again pressing the remote devices button(17,20), then the corresponding name(21). The interface or the remote(22) changes depending on the active component.
Luckily, the TV was set up with the first code, the Set top Box with the first code with the right product, and the DVD with the 5th code.


No comments:
Post a Comment